SEARCH SITE


FEATURED

MORE FEATURED


LINKS
TAGS
Abandoned Disney (8) Adventure Thru Inner Space (2) Adventureland (12) America Sings (1) Animal Kingdom (2) Animation (19) Animatronics (20) Area Music (7) Backyard Imagineering (6) Behind-the-Scenes (39) Big Thunder Mountain (3) California Adventure (6) Captain E.O. (1) Carousel of Progress (12) Castle (7) Characters (6) Club 33 (1) Concept (13) Construction (15) Country Bear Jamboree (2) Death (2) Disney Channel (1) Disneyland (50) Disney-MGM Studios (1) Donald Duck (3) Entertainment (5) Epcot (28) Fantasyland (16) Fess Parker (1) Film (25) Frito Kid (4) Frontierland (14) Germany (1) Hall of Presidents (4) Haunted Mansion (10) Hidden Mickeys (2) Holidays (1) Hollywood Studios (1) Horizons (3) House of the Future (1) Illustration (3) John Lasseter (4) Journey Into Imagination (2) Jungle Cruise (15) Lake Buena Vista (1) Liberty Square (3) Lillian Disney (2) Ludwig Von Drake (1) Magic Kingdom (23) Main Street U.S.A (12) Maintenance (1) Management (4) Maps (13) Marc Davis (8) Marty Sklar (3) Matterhorn (6) Monorail (4) Mr. Lincoln (3) Muppets (2) Music (3) Mystery (9) Nature's Wonderland (7) New Orleans Square (6) Orange Bird (2) Paul Frees (1) PeopleMover (10) Peter Pan (2) Photos (1) Pirates of the Caribbean (9) Pixar (5) Pleasure Island (1) Podcast (1) Progress City (1) Props (2) Railroad (2) Resorts (2) River Country (4) Rivers of America (2) Roy Disney (1) Scale Models (21) Skyway (3) Song of the South (2) Sound Effects (2) Souvenirs (3) Space (3) Space Mountain (7) Splash Mountain (1) Tangled (2) The Living Seas (1) Then and Now (17) Tiki Birds (2) Tilt Shift (2) Tomorrowland (39) Tomorrowland 67 (8) Treehouse (1) Vintage Disneyland (3) Walt Disney (15) Walt Disney Family (7) Walt Disney Family Museum (1) Walt Disney World (6) Ward Kimball (1) Wonders of Life (1) World of Motion (2) World's Fair (2) Yeti (1)
MORE MORE FEATURED


Orange Bird Photo Hunt

EVEN MORE FEATURED

ADMINISTRATORS
Tuesday
May142013

Tomorrowland '67 [Part 4]

In Part 3 we explored little-known details about the Carousel of Progress at Disneyland and its upper-level Progress City. Now we turn back the clock even further to a time when the Carousel of Progress was going to have an OMNIMOVER RIDE! This wonderful concept has been right under our noses for years yet we never hear anyone talking about it. Let's gather some concept art and make sense of this great idea. 

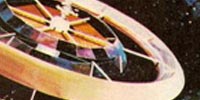
After the success of the Carousel of Progress at the World's Fair, Disney pitched a concept to General Electric that included a ride system similar to the system later built for EPCOT Center's Spaceship Earth. The vehicles were to be called "G.E.M.s" or "General Electric Mobiles" (above). How would an entire ride system have fit into the Carousel Theater?

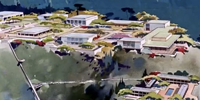
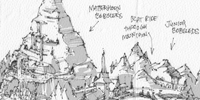
Take a look at the first image in this post and next image below. We've seen these pieces of concept art in various books over the years. The image below has been on display on Main Street at Disneyland for the last few years. But have you ever noticed how the lower level of the Carousel of Progress building is without walls? It's an open-air architecture. The rotating Carousel Theater appears to be on the upper level. Yep, that was the plan.

Disney planned for a switchback ramp on the exterior of the building, much like the one at World's Fair. Guests would have walked from ground-level up to an upper-level queue before boarding the attraction. Audience members would have exited their theater seats after Act 4, then entered a boarding area in front of them.

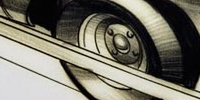
The following concept art by John Hench has always intrigued and fascinated me. I have often heard and read that this piece represents the speedramp that was built for Tomorrowland '67. You know, the ramp that took the audience from the lower level to the upper level of the building. It's often assumed that the vehicles in the rendering were Peoplemovers. The vehicles are actually "G.E.M.s" and this all takes place on the upper level of the building.

From the upper level, the ride vehicles would have taken passengers on a slow downward spiral towards a Progress City model, as seen in the next piece of concept art. The model city would have been below the Carousel Theater. In fact, it would have been well below the upper level. The center of the model would have been at basement level.

FUN FACT: A basement of sorts was built under the Carousel of Progress building (now the Innoventions building) and is still there today. I would often enter this basement area from a staircase backstage on the far east side of the building not far from the men's locker room. The locker room was on the back side of the Grand Canyon Diorama. A long basement hallway would lead to the Alpine Gardens (now Pixie Hollow) near the Matterhorn. The basement area and hallway look a lot like Magic Kingdom's Utilidors.

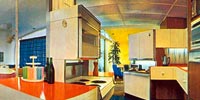
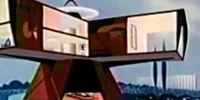
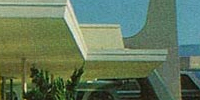
The following artwork is a detail from a broader Hench rendering of the General Electric Pavilion at the 1964-65 New York World's Fair. The concept of the zig-zag roofs over various full-scale (or almost full-scale) show scenes was to be included in the omnimover attraction at Disneyland. Not only would guests have traveled closer and closer to the scale Progress City model, they would have experienced up-close views of G.E.-living at its best. 

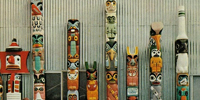
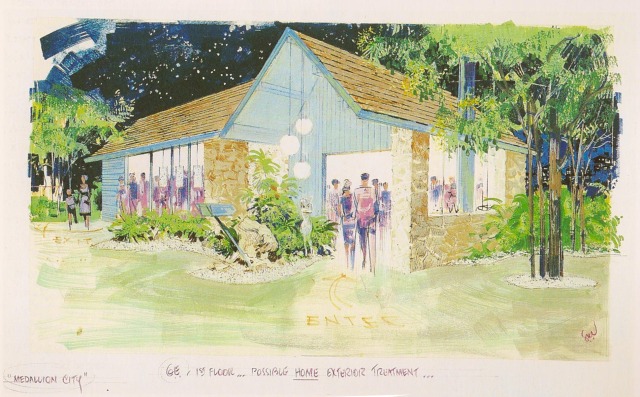
Show elements would have been similar to G.E.'s "Medallion City" exhibit in their World's Fair Pavilion.

We learn something interesting about the proposed G.E.-sponsored building in the next image, courtesy of the great Tomorrowlounge 67 website. The building was to have an open center, like a donut. This would explain the palm trees in the images 1 and 5 of this post. Would the model city in the center of the donut have been exposed to rain and other weather? Perhaps the model city was protected. Perhaps it was gradually revealed to ride passengers and not visible from the boarding area. I can't be certain.

Another interesting thing we learn from this next piece is that a different People Mover track layout was planned. See how it doesn't stretch down the middle avenue from the rocket tower towards the entrance of the land? Sort of like Magic Kingdom's Peoplemover layout. Also, it appears to travel all the way over towards what is now the Storybook Land queue.

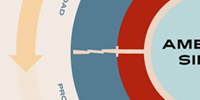
Here I've prepared a set of cross sections representing both the proposed attraction and the attraction that was actually built.


At some point the idea of an open-air lower level was changed to a walled-in lower level. You'll notice the Carousel of Progress show is still on the upper level. It looks like the Peoplemover track was to exit the north side of the building but look how it comes out of the building on the lower level, unlike the version that was actually built.

Why did this magnificent concept never come to pass? My guess would be... money. Isn't it always money?

There are still plenty of mysteries surrounding this Carousel of Progress/Progress City ride. What was it going to be called? What else was it going to include? If you have more information on the subject, please let us know. Email us at Imagineering.Disney@gmail.com.


Related posts:

Tomorrowland '67 [Part 1]
Tomorrowland '67 [Part 2]
Tomorrowland '67 [Part 3]
1967 "New Tomorrowland" Broadcast
America Sings
THEN AND NOW: 1964-65 New York World's Fair
Carousel of Progress Like You’ve Never Seen It


Sunday
Apr212013

Tiny Submarine Voyage + PeopleMover Model

After having such a great time making a tiny Jungle Cruise model, I decided to make a tiny model of a couple of other favorite attractions.

This time around I chose start with the wooden box. Filled it with a block of floral foam and began to carve.

The texture of the foam made for nice rock details. I painted all the rockwork a dark color then dry-brushed a highlight color over the outermost surfaces of the rocks. Painted the water and let it dry.

I then cut and painted a styrene strip to look like the guide track that Disneyland's old Submarine Voyage (and it's replacement, Finding Nemo Submarine Voyage) used to keep the subs on course.   

Began adding Woodland Scenics Realistic Water to the lagoon.

Using various StripStyrene styrene strips, I shaped the back end of a submarine. The styrene is easily joined using any brand of general purpose plastic solvent cement. I like Plastruct Plastic Weld. TIP: Hold any two pieces of styrene together and brush the solvent along the seams. No need to add solvent between pieces before joinging. Solvent isn't a glue. It actually melts the styrene pieces together then evaporates away.

I chose to paint the submarine the original gray color, much like I wanted the early striped Jungle Cruise canopy in the last model.

Applying generous amounts of green paint to will allow plenty of turf to stick.

I then sprinkled on a thick layer of modeling turf onto the wet paint. Dumped it off once dry.

More styrene strips for the construction of the PeopleMover track.

Tiny little baby PeopleMover cars. Isn't that CUTE??

PeopleMover Construction Update: In response to some question posted below, here's the process I used to construct the PeopleMover cars. After attempting a few different things, I found this to be the most successful. Join a thin strip to the bottom of the thicker strip you plan on using for your cars. The thin strip will help keep everything together. Follow each step below. As for the little roofs, I suggest cutting those separately. 

Added pretty bushes.


I wanted some good detail and depth in the the lagoon water. I added small plants between layers of water. After each thin layer of water dried, I colored little details directly onto the dry surface of the water using brightly-colored Prismacolor markers. Marker ink is inherently translucent which added a great effect.

Started adding pretty little trees. Trimmed them like I was Mr. Miyagi. Purple sewing scissors required.

Adorable and life-like little Woodland Scenic Fine-Leaf Foliage trees.

Once the PeopleMovers were painted (VERY DIFFICULT) and were solvent-ed to the track, the model was complete!

Up on the shelf it goes, right next to this project and of course this project.

I'm so tired. But I can't stop at two. Maybe one more. My wife has requested I make her favorite ride exterior. I can't say no... This is the first time she's ever asked me to make ANYTHING Disney-related for her. \

Also... Am I the only one who wishes they'd just classify the Finding Nemo Submarine Voyage as a Fantasyland attraction? Wouldn't that solve the whole "non-futuristic singing fish don't belong in Tomorrowland" argument?? They already "moved" the Matterhorn from Tomorrowland to Fantasyland a few years after it was built for similar reasons. Just do it, Disney. (Then fix Tomorrowland.)


Related posts:

Tiny Jungle Cruise Model
Mars
 and Beyond Robot
EPCOT City Model [Part 1]
Swiss Family Treehouse Model
Mechanizing a Miniature Main Street Electrical Parade
The Wonders of Nature's Wonderland [ PART 2 ]


Sunday
Apr072013

Tiny Jungle Cruise Model

I recently decided to make a little Jungle Cruise model for my home office. I'd like to share the process in case others might want to do something similar.

I started by cutting a 2"x2"x1.5" block out of floral foam. You know, the stuff you put at the bottom of vases of fake flowers. 

I then carved a waterway.

Applied paint.

Sprinkled generous amounts of fine modeling turf onto the fresh green paint. Once dry, I blew it off.

Added additional paint and modeling shrubs.

These spiffy little trees are called Fine-Leaf Foliage and come in large clumps. They are a product of Woodland Scenics and can be found at your local hobby store.

I chose to construct the tiny Jungle Cruise boat (old-style) from styrene plastic strips.

Boat Construction Update: Since the initial post, several people have asked for more information about the boat construction. The following image might help. The boat is made up of only four pieces of styrene. Use the appropriate sizes of styrene strips to cut each piece. Gently score lines into the top and sides of the canopy with a blade. When joining styrene, hold any two unpainted pieces together and brush a small amount of solvent along the seams. No need to add solvent between pieces before joining. Note: Solvent isn't a glue. It actually melts the styrene pieces together then evaporates away.

Painting the red stripes on the canopy was a bit tricky. I painted the entire top and sides red, making sure the red paint fulled each tiny little groove. Before the paint was dry, I wiped off each surface. The paint inside the grooves remained in place.

After the waterway paint was dry, I added a liquid product called Realistic Water, also from Woodland Scenics.

Several thin layers later, the waterway is nice and dry and very clear. Notice how the boat measures up to a penny?

More foliage.

Tiny palm trees at this scale can be difficult to find. Had to make my own out of straight pins and watercolor paper colored with a Prismacolor marker.

Painted the pins.

For a sturdy frame, I purchased a strip of a nice wood at the hardware store and cut it to fit.

Glued the frame in place.

And finally....... the finished product.

Up on the shelf it goes. Right next to my Ward Kimball Mars and Beyond homemade robot. Read about him in this earlier blog post.


Related posts:

Mars and Beyond Robot
EPCOT City Model [Part 1]
Swiss Family Treehouse Model
Mechanizing a Miniature Main Street Electrical Parade
The Wonders of Nature's Wonderland [ PART 2 ]